간결하고 효율적인 Swift 코드 테스트를 위해 나온 Swift Testing.
오픈 소스로 되어있어 언제든 코드에 접근할 수 있다.
테스트가 왜 필요한지부터 설명해주는 친절한 WWDC 영상! (UITesting은 뭐 없나 ㅎ)

Swift 6.0+ | Xcode 16.0+ (미래의 내가 언젠가 쓸 일이 있겠지..!)
테스트 선언 및 테스트 값 체크
import Testing

@Test func videoMetadata() {
    // ...
}- XCTest 대신 Testing을 import
- 함수 명에 test를 붙이지 않고 함수 앞에 @Test 어노테이션을 붙임.
#expect
import Testing
@testable import DestinationVideo

@Test("Check video metadata") func videoMetadata() {
    let video = Video(fileName: "By the Lake.mov")
    let expectedMetadata = Metadata(duration: .seconds(90))
    #expect(video.metadata == expectedMetadata)
}- @Test 괄호 안에 string을 지정해주면 func 이름이 아니라 내가 지정한 string으로 테스트 목록에서 테스트 이름을 볼 수 있음.
- 테스트를 할 때는 #expect로 판별 (XCTAssult-로 판별하던 것들 거의 다 #expect로 확인할 수 있다)

expect로 검사했을 때 실패하는 경우 Show 버튼을 누르면 뭐가 틀렸는지 더 자세히 알려준다.

맨날 XCTAssert로 체크하면 디버깅해서 뭐가 틀린건지 확인했었는데 Swift Testing은 result를 바로 확인할 수 있어서 좋은 것 같다.
#required
import Testing

@Test func brewAllGreenTeas() throws {
  try #require(throws: BrewingError.self) {
    brewMultipleTeas(teaLeaves: ["Sencha", "EarlGrey", "Jasmine"], time: 2)
  }
}- Assert 같이 전제 조건을 확인할 때 사용 실패시 error throw
let method = try #require(paymentMethods.first)
#expect(method.isDefault) // not executed- XCUnwrap을 대신할 수도 있다. require로 확인하는 optional 값이 nil인 경우 test가 종료된다.
Suite
XCTest와 다르게 클래스로 만들지 않아도 @Test 어노테이션만 붙이면 함수가 테스트가 되는 Swift Testing.
그러나 내가 원하는 단위로 테스트들을 묶고 싶을 때 struct나 class로 선언하는 것 또한 가능하다. (아마 이렇게 묶는 걸 Suite라고 하는 것 같긴 한데.. 확실하게 이해한걸까 ㅎ)
import Testing

@Suite("Various desserts")
struct DessertTests {
    @Suite struct WarmDesserts {
        @Test func applePieCrustLayers() { /* ... */ }
        @Test func lavaCakeBakingTime() { /* ... */ }
        @Test func eggWaffleFlavors() { /* ... */ }
    }

    @Suite struct ColdDesserts {
        @Test func cheesecakeBakingStrategy() { /* ... */ }
        @Test func mangoSagoToppings() { /* ... */ }
        @Test func bananaSplitMinimumScoop() { /* ... */ }
    }
}- Suite도 Test와 마찬가지로 이름을 지정할 수 있다.
- Suite 내부에 Suite를 중첩해서 지정하는 것도 가능하다.
Tag
기존 테스트 코드는 테스트 목록을 확인할 때 파일 내에 있는 테스트들 정도로만 분류되고 있었는데, Swift Testing에서는 테스트 메서드 또는 Suite 별로 Tag를 지정해 Tag별로 테스팅이 가능하다. (이 Tag는 파일, suite, target을 구분하지 않고 한데 모아준다!)
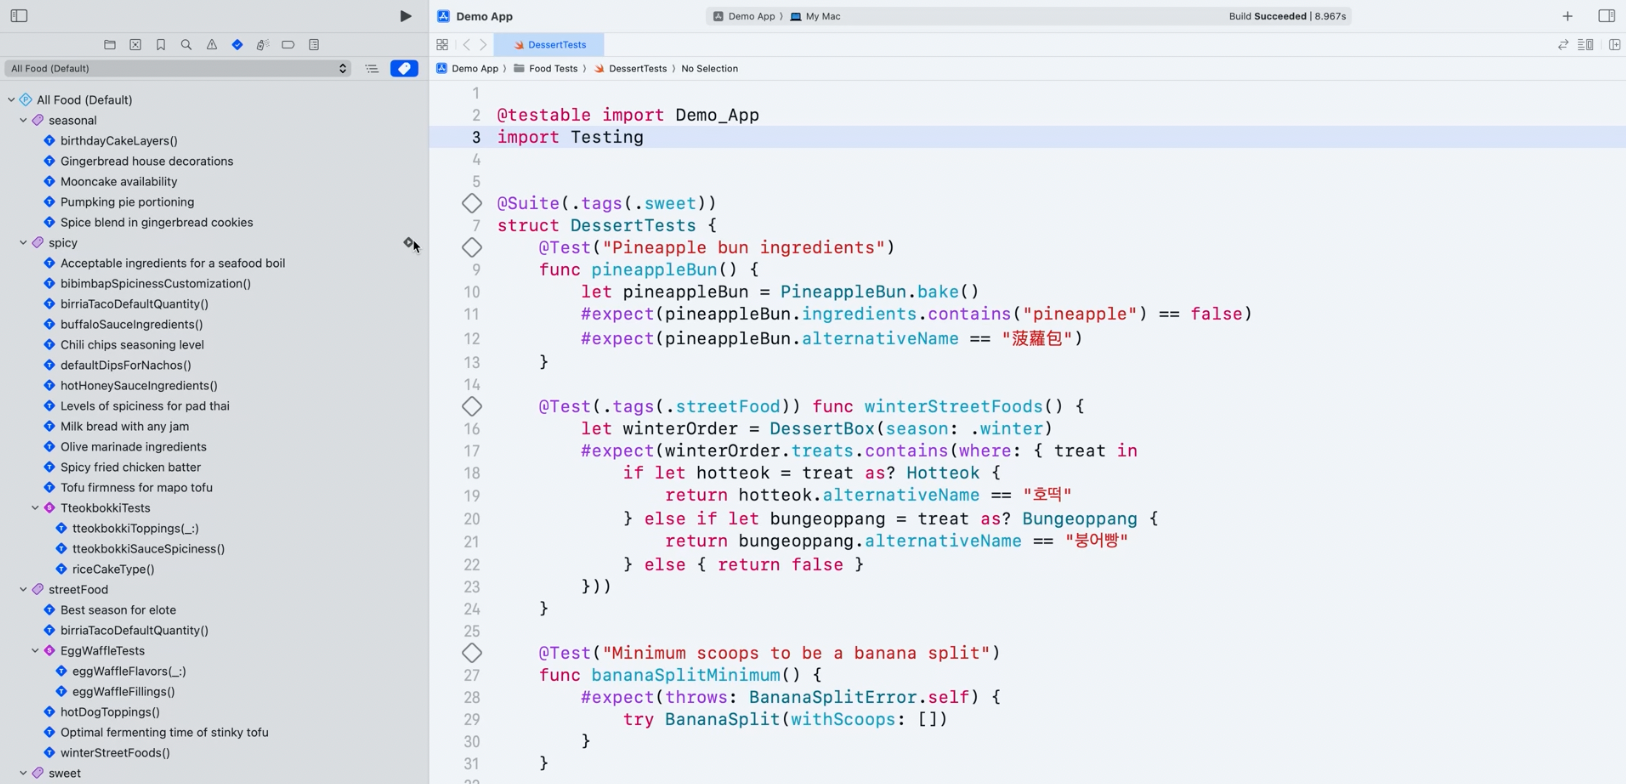
좌측 테스트 코드 목록에 태그 표시가 추가되었다. 태그별로 테스트 메서드를 볼 수 있게 된 것..!
나중에 스펙별로 또는 버전 별로 테스트 코드를 관리할 수도 있을 것 같아서 좋아보인다.
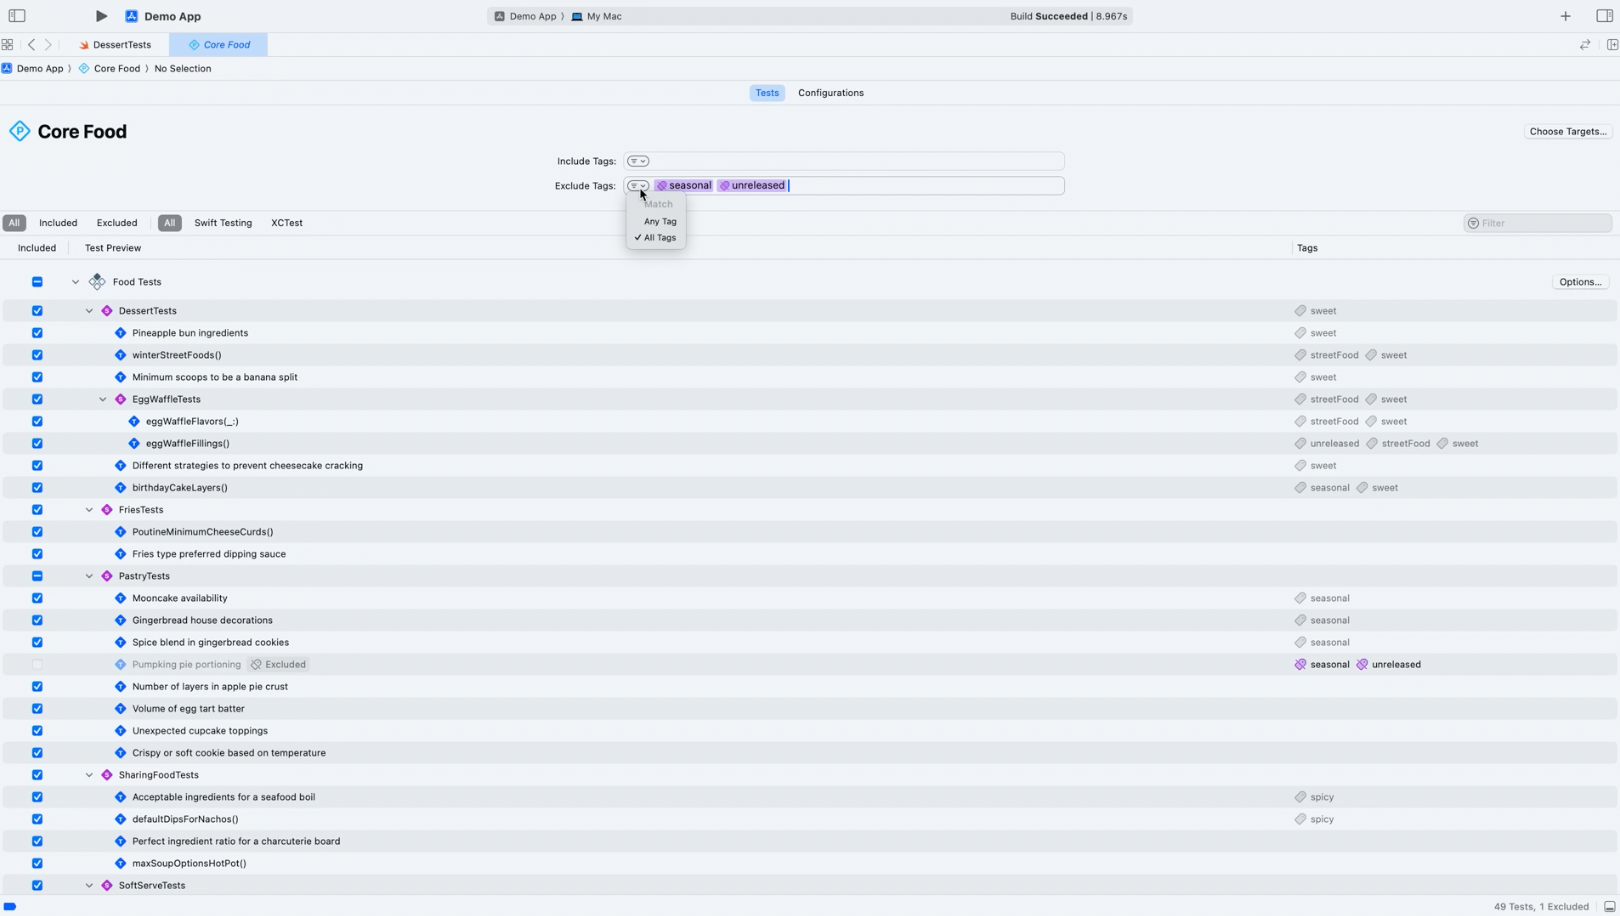
테스트 코드를 실행할 때 원하는 Tag만 포함하거나 빼고도 실행할 수 있어서 잘만쓰면 매우 유용할듯..!
import Testing

extension Tag {
    @Tag static var caffeinated: Self
    @Tag static var chocolatey: Self
}

@Suite(.tags(.caffeinated)) struct DrinkTests {
    @Test func espressoExtractionTime() { /* ... */ }
    @Test func greenTeaBrewTime() { /* ... */ }
    @Test(.tags(.chocolatey)) func mochaIngredientProportion() { /* ... */ }
}

@Suite struct DessertTests {
    @Test(.tags(.caffeinated, .chocolatey)) func espressoBrownieTexture() { /* ... */ }
    @Test func bungeoppangFilling() { /* ... */ }
    @Test func fruitMochiFlavors() { /* ... */ }
}- 태그 추가는 Suite와 Test 어노테이션 뒤에 붙고, 태그를 추가하는 것도 가능하다.
- 한번에 여러개의 태그도 추가할 수 있다
Runtime condition trait
@Test(.enabled(if: AppFeatures.isCommentingEnabled))
func videoCommenting() {
    // ...
}- .enabled를 활용하면 테스트가 가능한 조건일때만 Test 실행이 가능하다
import Testing

@Test(.disabled) func softServeIceCreamInCone() throws {
    try softServeMachine.makeSoftServe(in: .cone)
}- 반대로 Test를 실행하지 않도록 하는 .diabled 옵션도 있다.
import Testing

@Test func softServeIceCreamInCone() throws {
    let iceCreamBatter = IceCreamBatter(flavor: .chocolate)
    try #require(iceCreamBatter != nil)
    #expect(iceCreamBatter.flavor == .chocolate)

    withKnownIssue {
        try softServeMachine.makeSoftServe(in: .cone)
    }
}- 추후에 수정될 때까지 테스트를 하지 않으려면 withKnownIssue로 테스트가 실패하는 부분을 감싸서 테스트 코드에서 실패하는 부분만 건너뛸 수도 있다.
Built-in traits
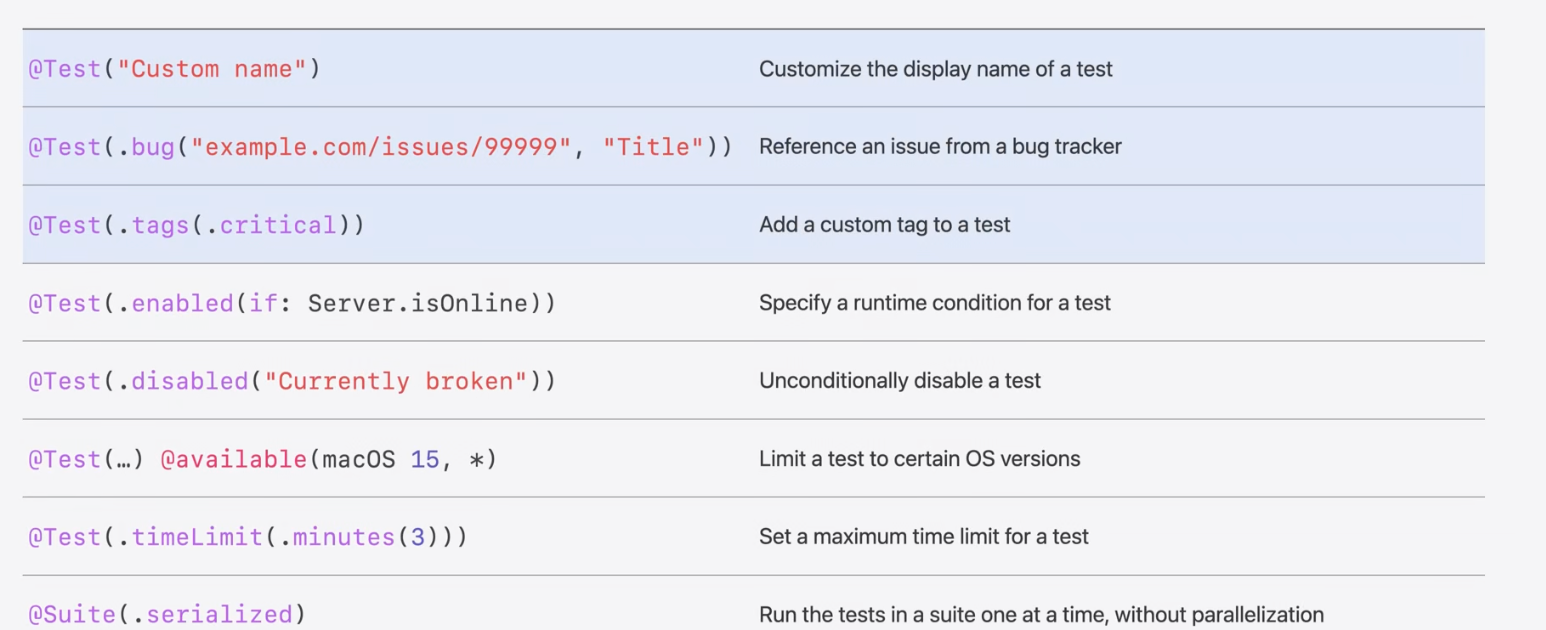
Runtime Conditions
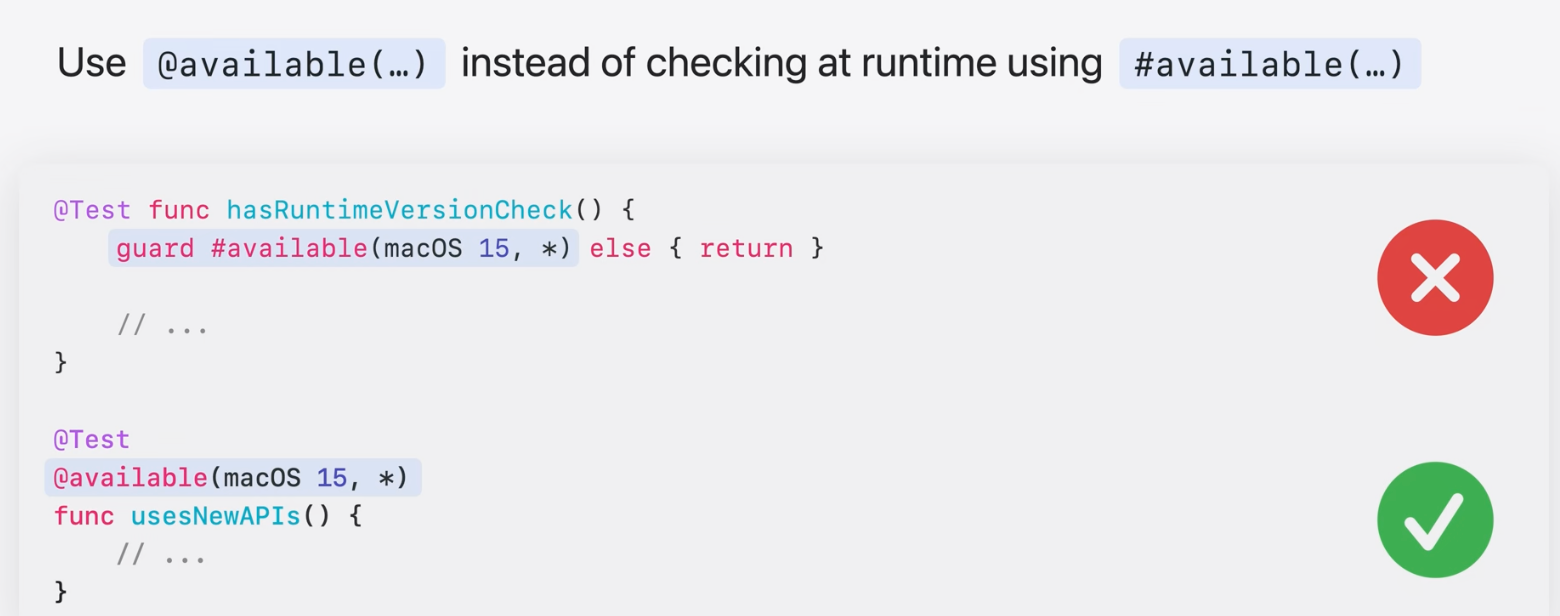
OS Version 분기가 필요할 때는 #available을 사용하지 않고 Test 어노테이션과 func 사이에 @available()을 사용해준다.
Parameterized @Test function
struct VideoContinentsTests {

    @Test("Number of mentioned continents", arguments: [
        "A Beach",
        "By the Lake",
        "Camping in the Woods",
        "The Rolling Hills",
        "Ocean Breeze",
        "Patagonia Lake",
        "Scotland Coast",
        "China Paddy Field",
    ])
    func mentionedContinentCounts(videoName: String) async throws {
        let videoLibrary = try await VideoLibrary()
        let video = try #require(await videoLibrary.video(named: videoName))
        #expect(!video.mentionedContinents.isEmpty)
        #expect(video.mentionedContinents.count <= 3)
    }

}- arguments를 받아 똑같은 코드를 여러번 작성하지 않고도 테스트를 여러 버전으로 할 수 있다.
- 여기서는 mentionedContinentCounts의 메서드에 videoName 파라메터가 추가되었다
import Testing

enum Ingredient: CaseIterable {
    case rice, potato, lettuce, egg
}

enum Dish: CaseIterable {
    case onigiri, fries, salad, omelette
}

@Test(arguments: zip(Ingredient.allCases, Dish.allCases))
func cook(_ ingredient: Ingredient, into dish: Dish) async throws {
    #expect(ingredient.isFresh)
    let result = try cook(ingredient)
    try #require(result.isDelicious)
    try #require(result == dish)
}- argument 두 개도 받을 수 있다. (argument 두 개를 받으면 모든 조합의 수가 다 체크되니 zip을 사용하는 것도 좋은 방법)
Error Handling
Successful throwing function
// Expecting errors

import Testing

@Test func brewTeaSuccessfully() throws {
    let teaLeaves = TeaLeaves(name: "EarlGrey", optimalBrewTime: 4)
    let cupOfTea = try teaLeaves.brew(forMinutes: 3)
}
Throwing expectation
import Testing

@Test func brewAllGreenTeas() {
  #expect(throws: BrewingError.self) {
    brewMultipleTeas(teaLeaves: ["Sencha", "EarlGrey", "Jasmine"], time: 2)
  }
}- do-catch를 쓰는 게 아니라 expect 뒤에 실패시 던질 에러를 지정할 수 있다.
Complicated validations
import Testing

@Test func brewTea() {
    let teaLeaves = TeaLeaves(name: "EarlGrey", optimalBrewTime: 4)
    #expect {
        try teaLeaves.brew(forMinutes: 3)
    } throws: { error in
        guard let error = error as? BrewingError,
              case let .needsMoreTime(optimalBrewTime) = error else {
            return false
        }
        return optimalBrewTime == 4
    }
}
- 원하는 에러만 걸러서 체크도 가능하다
Serialized Testing
기본적으로 Swift Testing은 병렬로 실행된다. 테스트 순서가 중요한 경우는 Serialized Testing 방법을 확인하고 코드를 수정해주어야 한다.

근데 테스트가 순서대로 꼭 실행되어야 하는 경우가 있다면? (애플에서는 컵케이크를 굽는 함수의 테스트 코드와 먹는 함수의 테스트 코드를 예로 들어 설명해줬다) .serialized를 사용할 수 있다. (중첩된 Suite가 있는 경우 두 번 써주지 않아도 하위까지 모두 적용됨)
import Testing

@Suite("Cupcake tests", .serialized)
struct CupcakeTests {
    var cupcake: Cupcake?

    @Suite("Mini birthday cupcake tests")
    struct MiniBirthdayCupcakeTests {
        // ...
    }

    @Test(arguments: [...]) func mixing(ingredient: Food) { /* ... */ }
    @Test func baking() { /* ... */ }
    @Test func decorating() { /* ... */ }
    @Test func eating() { /* ... */ }
}
Asynchronous conditions
swift에서 제공하는 async/await 코드를 사용하면 별 문제가 없지만, completion handler를 사용할 때는 다음과 같이 withCheckedThrowingContinuation을 사용해주어야 한다.
import Testing

@Test func bakeCookies() async throws {
    let cookies = await Cookie.bake(count: 10)
    try await withCheckedThrowingContinuation { continuation in
        eat(cookies, with: .milk) { result, error in
            if let result {
                continuation.resume(returning: result)
            } else {
                continuation.resume(throwing: error)
            }
        }
    }
}
callback 메서드를 여러번 호출해야 하는 경우에는 confirmaion 메서드를 활용해야 한다. (그렇지 않으면 not concurrency-safe 하다고 swift6에서 에러를 뿜어내는 것 같음.)
import Testing

@Test func bakeCookies() async throws {
    let cookies = await Cookie.bake(count: 10)
    try await confirmation("Ate cookies", expectedCount: 10) { ateCookie in
        try await eat(cookies, with: .milk) { cookie, crumbs in
            #expect(!crumbs.in(.milk))
            ateCookie()
        }
    }
}- expectedCount에 0을 넣으면 내부 eat 메서드가 실행되지 않는다.
XCTest와 Swift Testing 비교
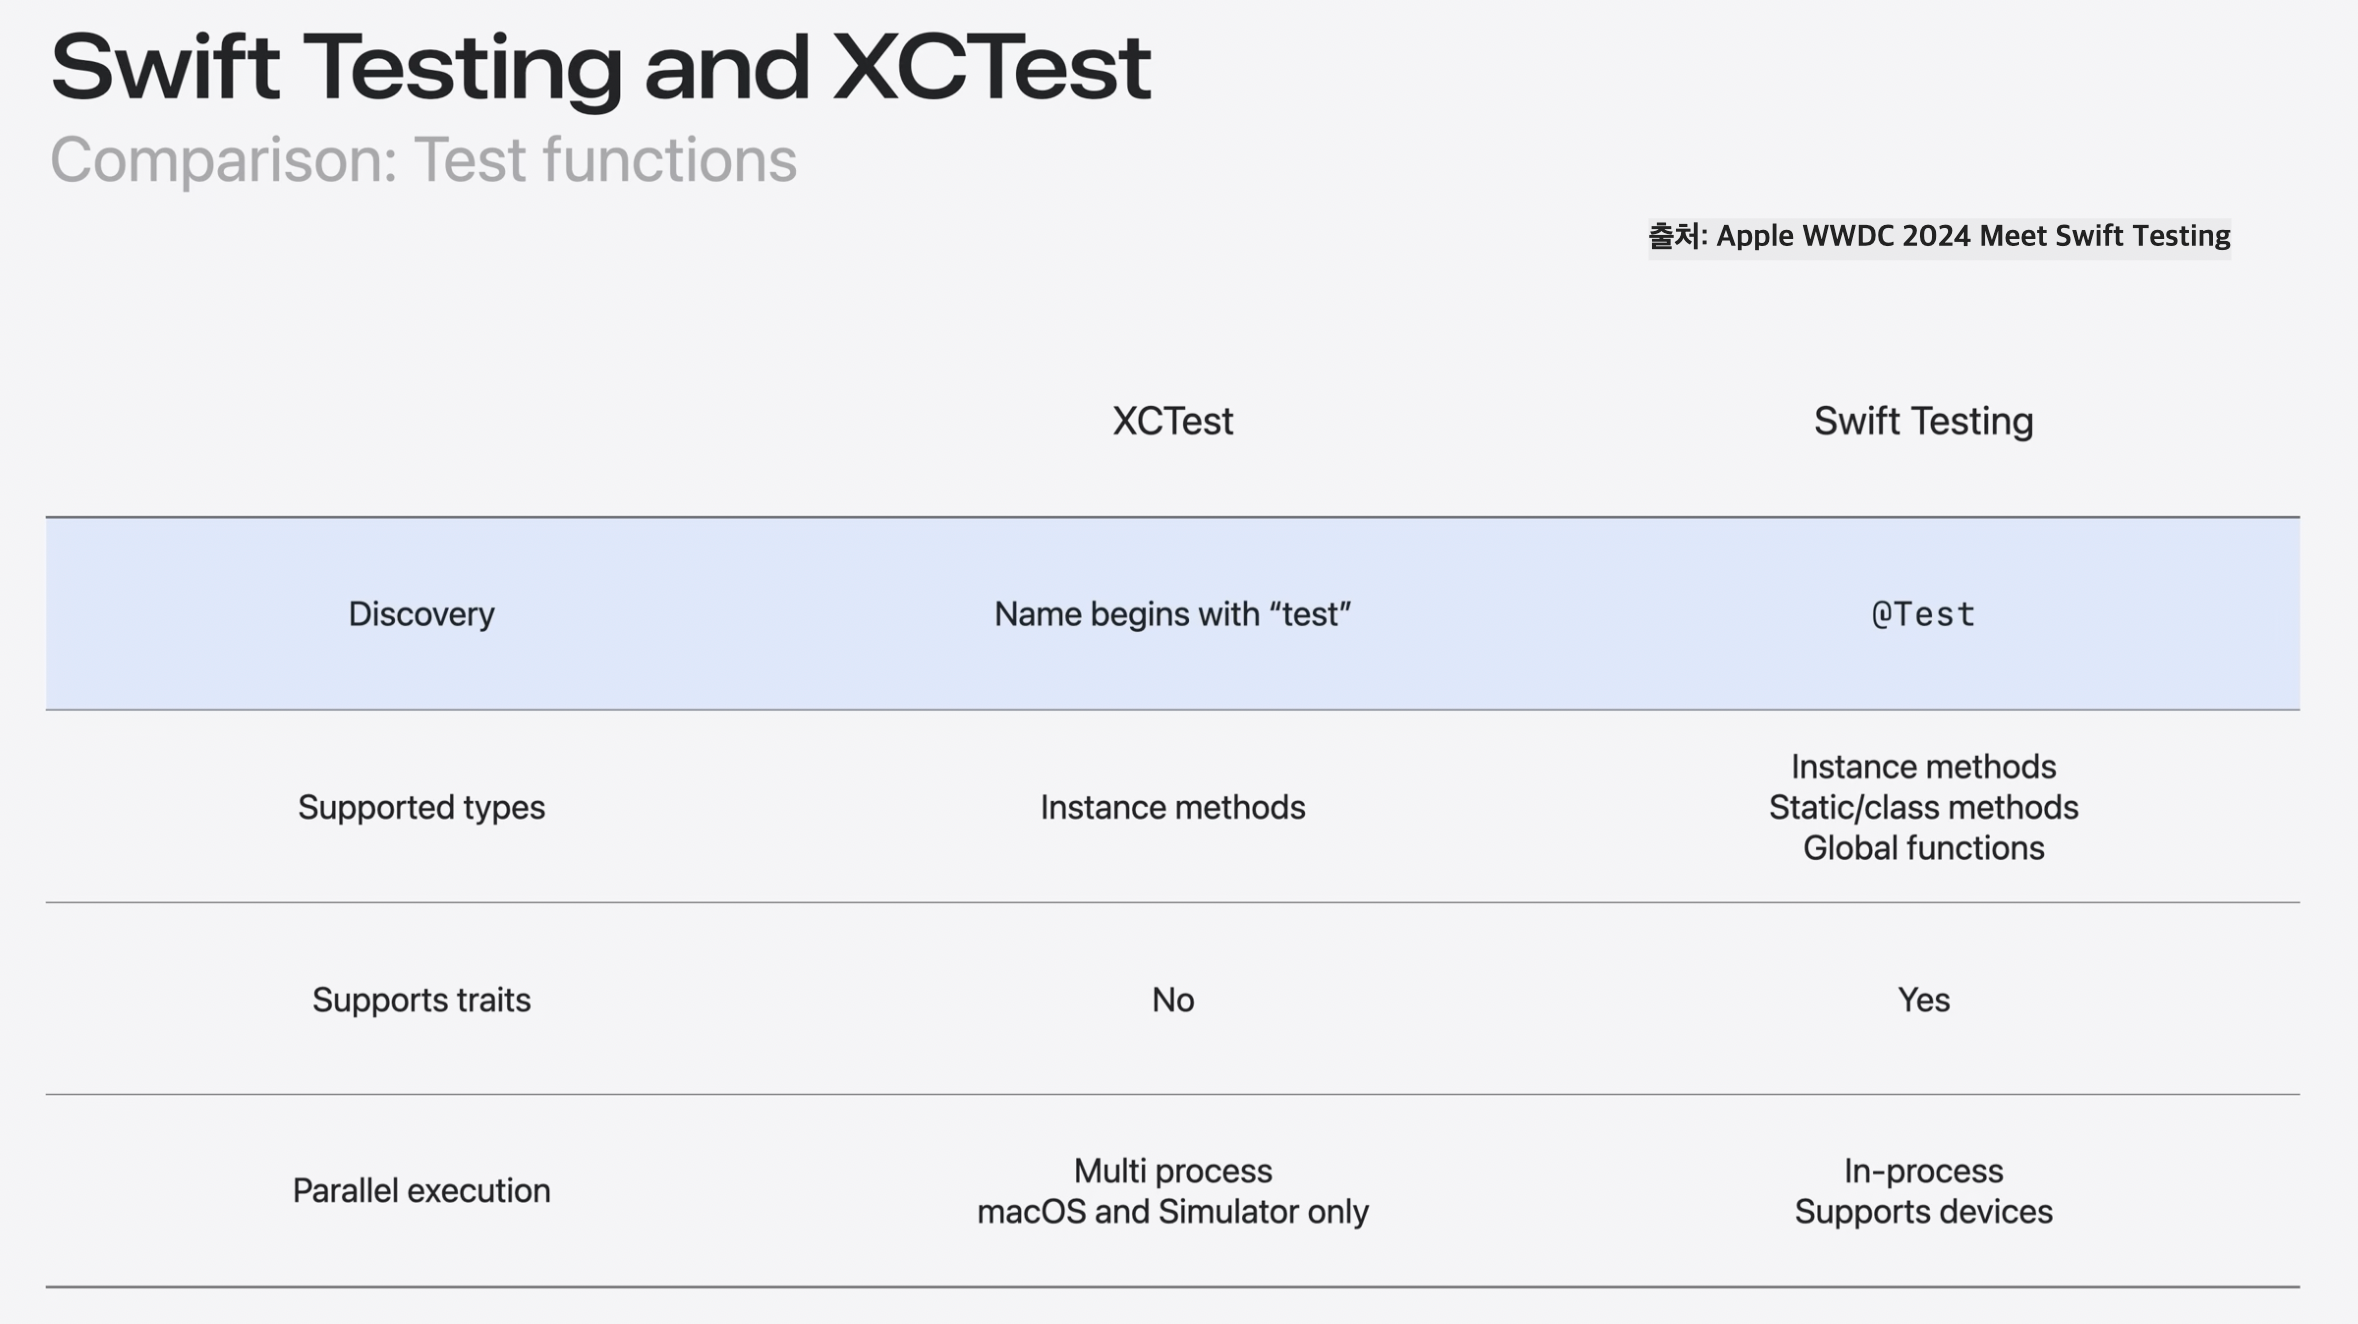
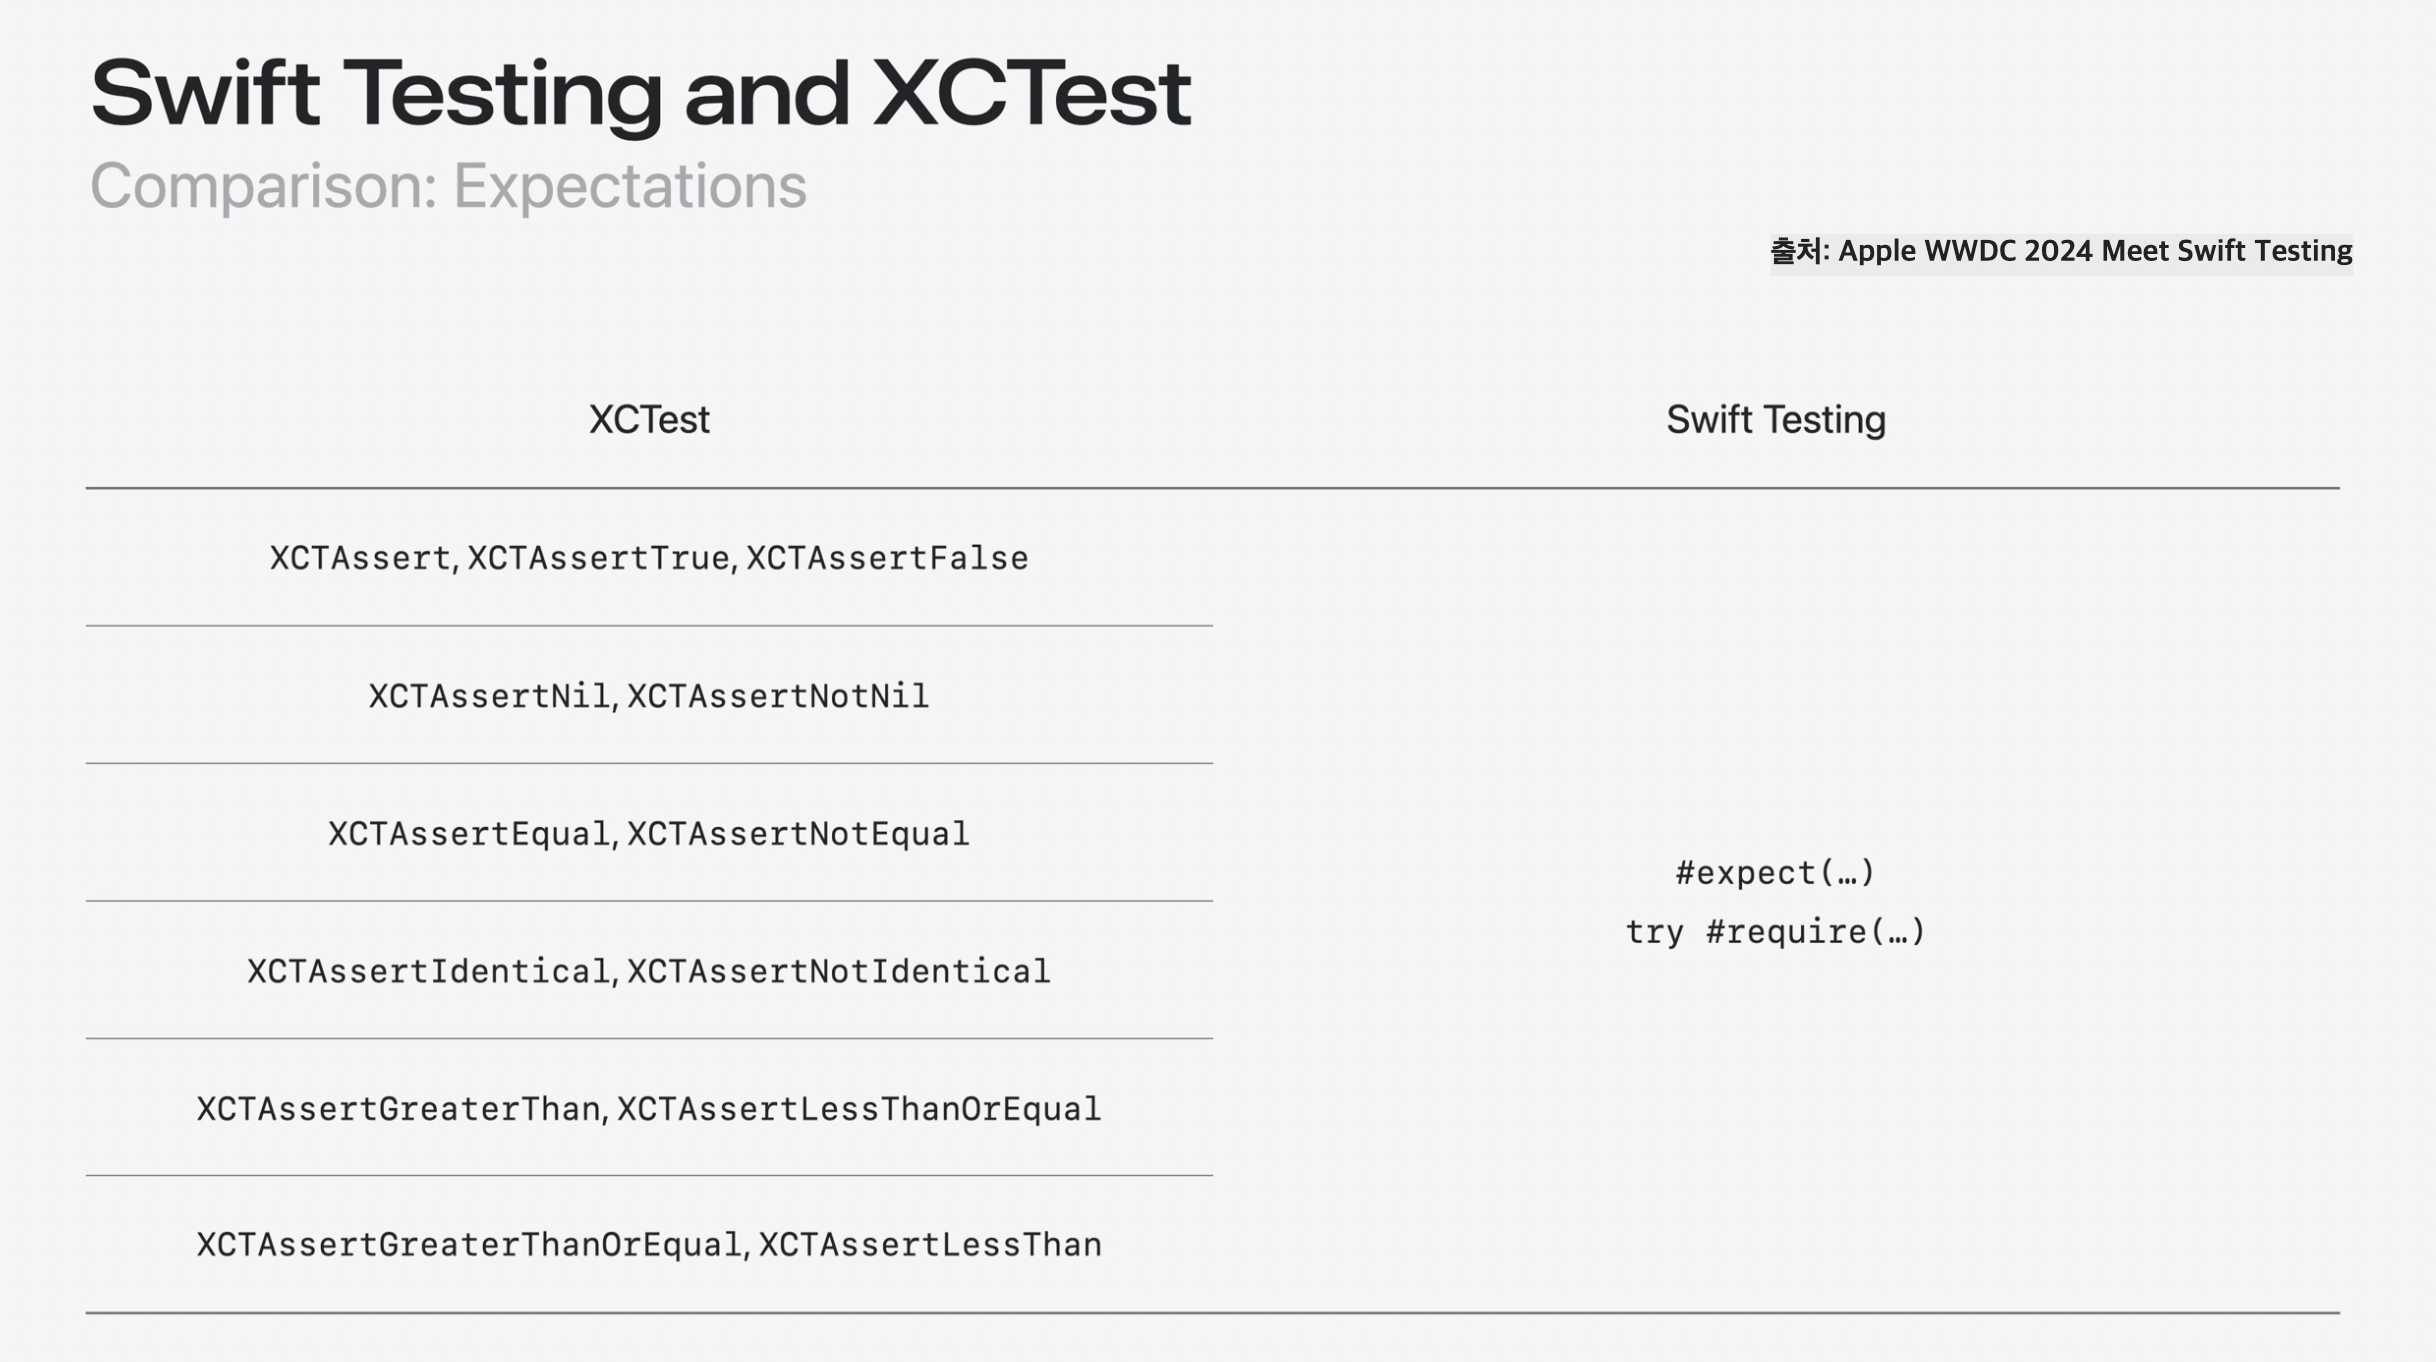

XCTest가 아닌 새로운 Test 프레임워크가 등장하다니..! 뭔가 이번 WWDC 영상을 보니까 테스트 코드를 작성하기가 조금 더 수월해지고, 간결해진 것 같다. 언제 써먹어볼 수 있을지 모르니 미래의 내가 볼 수 있게 정리해본 WWDC Swift Testing 영상들. 혹시나 더 추가할 게 생기면 다시 돌아와서 적어두어야겠다.
참고하면 좋을 페이지들
'WWDC' 카테고리의 다른 글
| WWDC 2024 Keynote (0) | 2024.06.11 |
|---|---|
| [WWDC 21] Meet async/await in Swift (0) | 2023.02.14 |
